How to Carve Propellers from Wood
(Alternatively titled: I am a Sad, Sad Bastard)
People are constantly coming
up to me on the street and asking, "Gosh Andy, how
the heck do you carve those little wooden propellers on
your WW1 aircraft?" Why, just the other day Richard
Branson, always on the look out for new and money saving
methods of propulsion for his Virgin fleet, asked the
very same thing. "Well Dick", I said, "here's
how it's done:"
Step 1: Wood & Plans
I like to use the thin
plywood found in the flying models section of the hobby
shop. 1/32" ply works well for 1/72nd scale and 1/16"
ply suits 1/48th. In larger scales, I use thin veneer
and laminate several pieces together. See my Sopwith
Triplane for an example of this. I work mostly in
1/72nd, but the method is the same for any scale. The
example in the photos below is a Sopwith Camel prop done
to 1/48th scale so it would be easier to see.
Cut two (or more in larger scales) rectangular pieces
of wood slightly larger all around than the finished prop
will be. Cut one piece with the grain of the wood and
one piece across the grain; this will give you 6 alternating
layers as each piece of plywood is made up of three layers.
If cutting multiple pieces for larger props, I cut them
all with the grain, but use three pieces each of two different
types of wood to give a nice laminated look, like the
full size propeller. Laminate the wood together with whatever
glue you prefer. Strangely enough, wood glue seems to
work quite well. It's best to clamp the wood in a vise
while the glue is drying to get a good bond as having
a split appear in the propeller later is rather annoying.
Next, find a good set of plans of the aircraft you're
building. These usually have front and side views of the
prop. You may have to size the plans with a photocopier
to fit the scale you're building in. Make a copy of the
plans (copyright laws allow you to make one copy for your
own personal use, in case anybody gives you a hard time
about this) as you will need to cut them up and I assume
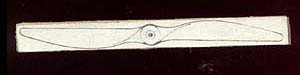
you wouldn't want to sacrifice the original. Cut out the
front view of the propeller and glue it to your previously
prepared wood blank. At this point you should have something
like this:
Step 2: Carve that monkey, Bubba
This is where the fun begins.
Carve away anything that doesn't look like a propeller.
I usually rough this out with a coarse sanding drum on
the trusty old Dremel moto-tool which makes short work
of it. Take it down to within about 1/32" of the
line and then use files and sandpaper after that. Accurate
carving here will make life much simpler later when the
final shaping is done, so take your time and ensure that
the blades are symmetrical and the hub is round and well
defined. Also, try to keep everything squared up, that
is, keep the sides at 90 degrees to the front and back
- you're just carving a flat blank at this stage so don't
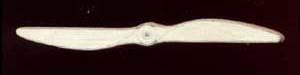
worry about the ultimate shape of the blades. All going
well, it should start looking like a propeller, from the
front anyway:
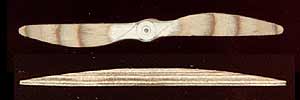
This is where the side elevation comes in. Carving the
proper taper in the blades is what will give the correct
twist later. It isn't practical to glue a copy of the
side view on the prop so just keep referring to it as
you carve. Again, I rough this out with the Dremel and
finish up with files and sandpaper. So far, this is what
the propeller looks like from the front and side:
Alrighty then. Still with me? Hello...?! Hey, wake up
- this is where it gets really interesting! Carving the
final blade shape. I switch to a sharp hobby knife
here. A brand new blade is best, otherwise you'll be getting
all sorts of splintering and gouging happening (possibly
in your own hand if the knife slips) which is just plain
unattractive. Basically, you want a nice airfoil shaped
blade - curved on the front and flat on the back - so
keep that in mind when carving. Take small amounts off
with each cut rather than try to do it in a couple of
big slices which would be a sure fire method of breaking
the prop, or carving off more than you meant to. The blades
will be surprisingly strong even in 1/72 scale, but it
wouldn't take a lot of pressure to snap them. After the
basic shape is roughed out with the knife use 320 grit
sandpaper to finish shaping and then switch to finer grades
for the final finishing. Here's what you've got, right?!?
Step 3: Finishing, bragging
to your cat about your amazing woodworking abilities,
etc., etc.
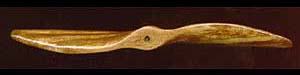
A final sand with 600 grit
sandpaper to smooth everything out, and then finish off
however you like. I use a thinned brown enamel for a stain
followed by another light sanding with 600 or 1000 grit
to bring out the grain. Finish off with a couple of coats
of gloss clear, a photo etched prop boss and a bit of
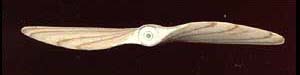
stainless steel tubing for the shaft and you're done.
And ta-da!!! Here it is:
Note I didn't have any photo etched prop bosses in 1/48th
scale thus the lack of one in the pic.
Here's a 1/72nd scale prop on Revell's D.VII for a better
idea: