Although the forerunner
of the excellent La-5 & La-7 fighters, the LaGG-3
was decidedly unpopular with VVS pilots and groundcrew.
It was underpowered, underarmed, overweight and suffered
from poor maneuverability, a temperamental hydraulic system
and unreliable Klimov engine. Initial conversion caused
such high attrition rates that VVS pilots were suggesting
LaGG stood for "lakirovanny garantirovanny grob",
loosely translated as "varnished guaranteed coffin".
Very inspiring. Perhaps it is somewhat appropriate then
that Roden's LaGG-3 is rather a dog as well, although
to be fair I never actually feared for my life whilst
building it.
This model was very kindly
donated by my cyber-friend(?) Todd Moore and was supposed
to be a simultaneous project as he was building the same
kit. Of course he finished his
months ago and being the slowpoke I am, I've only just
finished mine now! So much for simultaneous.
I'll be the first to admit
I know very little about Russian aircraft but this project
has somewhat fired my interest in them, and a quick look
through my books revealed I had more info on them than
I thought. My two main references for this kit were "Soviet
Air Force Fighters Part 1" by William Green and
Gordon Swanborough (MacDonald and Jane's, 1977) and "Soviet
Aces of World War 2" by Hugh Morgan (Osprey,
1997).
Roden's kit consists of reasonably well moulded parts
in a soft gray plastic and includes a multitude of optional
bits for various series of LaGGs, some of which are not
used in this release. There is a lot of flash to clean
up, in fact I had to literally carve the fuselage halves
out of the flash to remove them from the sprues! Once
cleaned up however, they look quite nice and there is
a fair bit of cockpit detail moulded in. That's pretty
much where the niceties end I'm afraid as getting the
parts to fit is an excercise in mind control that would
test the abilities of the most devout Zen Buddhist. Rather
than list the pieces that didn't fit I'll save time and
space by listing the pieces that did: the seat. Yep, that's
it. Everything else required vast amounts of filing, sanding,
cursing, filling, grinding, cursing, wedging, replacing,
cursing, shimming, cursing, cursing, and ummm.... cursing.
The fit of the wings to the fuselage was particularly
gruesome and no doubt had the CEO of Milliput laughing
all the way to the bank. Wonder if they have a trade deal
with Roden?
The rudder comes as a separate
part and I cut off the elevators and repositioned them
as well.
Roden would have you install the exhausts before the upper
cowling part but I prefer to add such items after painting
so I cut off the mounting flange on the exhausts and blanked
off the openings in the cowling from the inside with sheet
plastic.
Exhaust stains and dirt on the tires are pastels and paint
chipping is Humbrol Silver on the metal cowlings and propellor
and Dark Yellow on the wood airframe. Antennas are good
ol' stretched sprue.
Canopy frames are the usual
painted decal strips as are the silver prop blade cuffs.
I used a bit of the backing paper from one of these strips
for the leather canopy handle which is just visible above
the headrest. This is mainly to hide the seam in the fuselage
that I neglected to fix. I struggled to find a solution
for the curved frame on the windscreen and finally found
a couple of drop tank halves in my spares box that had
just the right shape. I used these as a template to cut
the frame from painted decal stock.
I drilled out the machine
gun, exhaust stacks and starter dog on the spinner as
well as opening up the carb intakes in the wing roots.
The gear doors and landing gear legs are quite thick which
made the wheels stick out way too far. I had to make do
with the gear legs as I couldn't find suitable replacements
so I dremeled grooves in the gear doors to try and get
them a bit closer to the wheels. It's a definite improvement
but I'm still not completely thrilled with it.
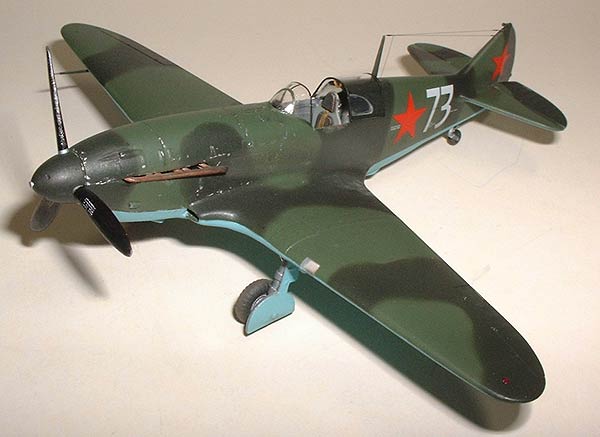
Underside paint is Revell Pale Blue/Green (55) with a
couple of drops of Humbrol Midnight Blue (15) in to brighten
it up a touch. Uppersurface camouflage is Polly Scale
RLM 70 Black Green with a bit of black in so it wouldn't
look like, well, RLM 70 Black Green. The dark green is
a 50/50 mix of Humbrol Dark Green (30) and Army Green
(102).
Decals aren't too bad although somewhat impervious to
setting solutions. Fortunately there are few panel lines
and few decals so it wasn't a problem. I chose N. Puzanov's
Series 11 aircraft (incorrectly identified on the instructions
as Galchenko's machine) from 145 GShAP.
Seatbelts are from Reheat's generic etched set and the
rudder bar is scratchbuilt. The moulded on detail looks
a bit soft but with a coat of paint and a dark wash it
looks okay I think. I thinned down the seat pan and control
stick grip so they wouldn't be quite as clunky.
A
big motherf***ing piece of sprue had to be wedged between
the fuselage halves in order to get the upper cowling
part to fit properly. I used the instrument panel decal
supplied and stuck a few Reheat instrument bezels
on to give it a bit of life.
It was at this point that I should have installed the
radio behind the seat but I didn't actually notice it
until it was far too late. Oops. More for the spares box.
Below left & right: Aaaaaaggh!!! My
pills, get me my pills! Remind me to invest in Milliput
shares.
Left:
I had to take the trusty Dremel to the inside of the radiator
housing to get it to fit over the lump of plastic that
passes for a radiator. The kit's thick splitter plate
was replaced with .010" sheet and note the piece
of fine stainless steel mesh I added to the front (and
rear) of the radiator lump. Take a good look, because
once the housing is on you'll need a 50,000 candlepower
light and a microscope to see it again. D'oh!! Right: The kit supplied
pitot vs my scratchbuilt one, and if I have to tell you
which is which I'm gonna reach out and virtually slap
you. :-)
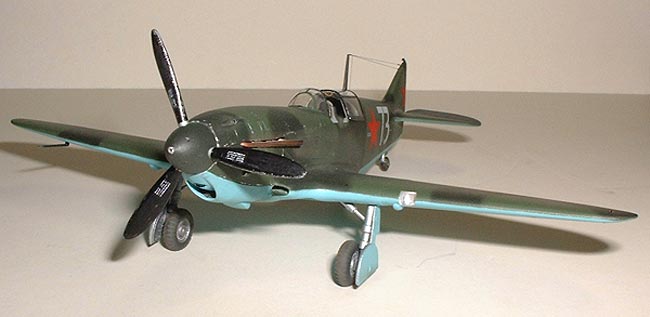
Right: The Falcon
canopy is actually meant for the Red Star kit but with
a bit of trimming here and there I actually got it to
fit better than Roden's canopy. Of course that's not saying
much since the kit canopy fit about as well as every other
part in the box - it didn't, in other words. I used a
thin strip of masking tape to hold the canopy in place
while I made a few final adjustments and then glued it
with gap filling super glue; the canopy that is, not the
strip of tape.
The landing light cover has been glued in, sanded and
polished to blend it in with the leading edge and the
carb intakes have been opened up. There's an MV Products
lens behind that landing light cover but you can't really
see it because of the poor quality clear plastic. D'oh
again!
Below
left: Ready for paint at last!! Note the copious
amounts of Milliput in the wing/fuselage seam. The black
paint just happened to be in my airbrush for some other
project so I sprayed a bit on the wing roots to check
my seam filling abilities. They need work apparently.
Above
right: I couldn't get the kit oil cooler &
radiator outlet pieces to fit at all (gee, what a surprise)
and they were far too thick for my liking anyway so I
replaced them with .005" sheet brass. The black line
behind the oil cooler inlet is another piece of fine stainless
mesh that can't be seen. I've discovered a new talent.


 Decals aren't too bad although somewhat impervious to
setting solutions. Fortunately there are few panel lines
and few decals so it wasn't a problem. I chose N. Puzanov's
Series 11 aircraft (incorrectly identified on the instructions
as Galchenko's machine) from 145 GShAP.
Decals aren't too bad although somewhat impervious to
setting solutions. Fortunately there are few panel lines
and few decals so it wasn't a problem. I chose N. Puzanov's
Series 11 aircraft (incorrectly identified on the instructions
as Galchenko's machine) from 145 GShAP. A
big motherf***ing piece of sprue had to be wedged between
the fuselage halves in order to get the upper cowling
part to fit properly. I used the instrument panel decal
supplied and stuck a few Reheat instrument bezels
on to give it a bit of life.
A
big motherf***ing piece of sprue had to be wedged between
the fuselage halves in order to get the upper cowling
part to fit properly. I used the instrument panel decal
supplied and stuck a few Reheat instrument bezels
on to give it a bit of life.

 Left:
I had to take the trusty Dremel to the inside of the radiator
housing to get it to fit over the lump of plastic that
passes for a radiator. The kit's thick splitter plate
was replaced with .010" sheet and note the piece
of fine stainless steel mesh I added to the front (and
rear) of the radiator lump. Take a good look, because
once the housing is on you'll need a 50,000 candlepower
light and a microscope to see it again. D'oh!!
Left:
I had to take the trusty Dremel to the inside of the radiator
housing to get it to fit over the lump of plastic that
passes for a radiator. The kit's thick splitter plate
was replaced with .010" sheet and note the piece
of fine stainless steel mesh I added to the front (and
rear) of the radiator lump. Take a good look, because
once the housing is on you'll need a 50,000 candlepower
light and a microscope to see it again. D'oh!!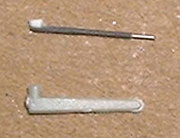 Right: The kit supplied
pitot vs my scratchbuilt one, and if I have to tell you
which is which I'm gonna reach out and virtually slap
you. :-)
Right: The kit supplied
pitot vs my scratchbuilt one, and if I have to tell you
which is which I'm gonna reach out and virtually slap
you. :-) Right: The Falcon
canopy is actually meant for the Red Star kit but with
a bit of trimming here and there I actually got it to
fit better than Roden's canopy. Of course that's not saying
much since the kit canopy fit about as well as every other
part in the box - it didn't, in other words. I used a
thin strip of masking tape to hold the canopy in place
while I made a few final adjustments and then glued it
with gap filling super glue; the canopy that is, not the
strip of tape.
Right: The Falcon
canopy is actually meant for the Red Star kit but with
a bit of trimming here and there I actually got it to
fit better than Roden's canopy. Of course that's not saying
much since the kit canopy fit about as well as every other
part in the box - it didn't, in other words. I used a
thin strip of masking tape to hold the canopy in place
while I made a few final adjustments and then glued it
with gap filling super glue; the canopy that is, not the
strip of tape.
