Like many people who slap
bits of plastic together in an attempt to form scale models
of full size objects, I have a great propensity towards
starting kits, but am severely lacking when it comes to
actually finishing them. Very often, like this P-63, it
will be the most trivial of tasks that stops me dead in
my tracks and results in the model languishing in its
box for several months/years/decades. In this case, it
was the minor task of re-scribing the panel lines around
the wing roots which were obliterated during the filling
and sanding stage that caused me to lose interest for
a couple of years. At the moment however, I'm doing my
very best to finish off all the old projects which have
been sitting about for far too long before starting something
new, and the P-63 is the latest beneficiary of this policy.
And it took all of five minutes a side to re-scribe those
wing roots when I finally got around to finishing the
kit. D'oh!!
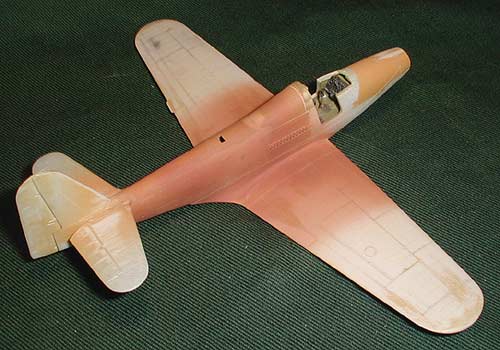
This isn't a horrendous
kit, but it isn't the best you'll come across either.
Fit was mediocre to poor in most cases, trailing edges
of the wings needed a great deal of scraping to thin them
down, and the engraved detail was very hit and miss. I
ended up re-scribing most of the kit because so much was
lost filling the seams and what was left was very inconsistent
anyway. Clear parts are rather thick but fairly clear,
and a dip in Klear/Future improved them even more.
Another issue concerns
the stance of the aircraft. P-63s tended to sit very nose
high on the ground with the bottom rear of the fuselage
almost parallel to the ground. Toko's Kingcobra sits pretty
much level, although the close-up pictures tend to give
it an exaggerated nose high look. The problem is that
the front forks aren't long enough and the main gear oleos
aren't compressed enough. Neither would have been difficult
to fix had I noticed it in time and if I was really bothered
about it. It looks like a P-63 and that's close enough
for me.
There are differing opinions
concerning the colour of these flying targets. The P-39/P-63
"Detail & Scale" says Orange/Yellow and
the colour profile in both it and the "In Action"
book are in this colour. The January 1998 issue of "Scale
Aircraft Modelling" says International Orange, and
the Air Force Museum's restored RP-63 has been finished
in that colour. My own personal belief is that since this
aircraft comes from the same stable and era as the Bell
X-1, it would have been painted the same "Pumpkin
Orange" colour, which is somewhat lighter and not
quite as intense as International Orange. There is a contemporary
colour photo of a flight of Pinballs in the aforementioned
SAM that does seem to show them as a Pale Orange, though
the picture quality is quite poor so there is a lot of
room for interpretation. I painted mine with Humbrol Orange
(18) with some Yellow and White thrown in to lighten it
up a bit.
The USAF's aircraft has the gear legs painted black which
I think is incorrect. Black and white pictures show the
nose gear leg at least to be noticeably lighter than the
anti-glare panel and propellor, and I think it's much
more likely that the gear legs were painted in "Bell
Green" like the P-39.
Toko's decals weren't bad,
but they were almost completely impervious to setting
solutions. The stars and bars were strangely proportioned
so I replaced them with some Superscale ones. Stencils
are from the spares box. I rearranged the kit serial numbers
to model 557311, just to be a bit different. Note also
that the "Pinball Do Not Tilt" markings belong
on an RP-63A which had a different style of dorsal intake
that isn't supplied in the kit.
I didn't care much for the white dots in the centre of
the black circles that were supposed to represent the
flashing lights (thus the "Pinball" name). I
used an eighth-inch drill bit to drill shallow holes where
the white dots were and then painted them silver. When
that was dry, I filled the holes with 5 minute epoxy and
had nice clear lights that are a big improvement. The
light in the spinner is the kit part, polished and backed
up with a bit of Bare Metal Foil.
Photos showed these things to be quite dirty with a lot
of exhaust staining, so I used my usual mix of Polyscale
Grimey Black and Clear Flat for the exhaust stains and
finished up with pastels for other miscellaneous dirt.
Paint chips are Metalizer aluminum. RP-63s had two pitot
tubes (I'm assuming one was a backup in case the other
got shot off) and these were made from brass rod and scrap
plastic.
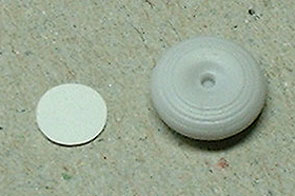
Left:
The nosewheel had a nasty sink mark on one side
so this was covered with a disc of .005" card.