Well, I waited a long time
but I finally got my wish for some Japanese WWII armour
in the manly scale, mainly thanks to Dragon, though IBG
Models has also recently come out with some very nice
kits. The Type 97 Chi Ha was always top of my list, ever
since building Tamiya's now aged kit in 1/35 scale when
I was a wee sprog (and one day I'll build it again, having
found an example a couple of years ago on everyone's favourite
auction site).
As much as I appreciate
Dragon fulfilling my wish, I have to say this isn't one
of their better kits. The fit of many parts left a lot
to be desired, especially the curved plate in front of
the driver's/gunner's positions. I used Mr. Surfacer 1000
to fill the gaps there, the advantage being that when
freshly applied, the excess can be wiped off with IPA
leaving a nicely filled seam without damaging the rivet
detail.
The other issue concerns
the wheels. Dragon has utilised slide moulding to cast
the return rollers and some of the double road wheels
as single parts, a practice that annoys me no end as it
makes cleaning up seams and painting more problematic
than it should be. I can see no advantage to this gimmick,
other than to save about 10 seconds per wheel gluing them
together! Frankly, I'd much rather the inner and outer
wheels were separate parts. On top of that, the faces
of the wheels were not aligned properly so that the wheels
were off centre in relation to the rubber tyres. I managed
to disguise this somewhat by judicious sanding but couldn't
eliminate it completely without seriously reducing the
tyre thickness all around. There were also other examples
of misaligned moulds, namely the antenna array, machine
guns and jack which required scraping and sanding to eliminate
the prominent ridges.
Dragon also used slide
mould technology to hollow out the ends of the gun barrels,
but again they were off centre so some corrective re-drilling
was required.
The perforated covers over
the exhausts are photo etched parts which look much better
than solid plastic pieces. These were easily curved to
shape by rolling the appropriate sections over the shank
of a drill bit. The tow cable is moulded in place which
doesn't look all that good. I considered trying to slice
it off and replacing it with braided cable but this area
is quite complex and the tow hooks would have been difficult
to replicate so I left it as is. The tools however are
separate parts and are nicely done. Dragon advise that
the DS tracks may need their length adjusting due to the
inherent elasticity of the material but mine fitted fine
as supplied.
Despite the fit and misalignment
issues, assembly was fairly quick due to the low parts
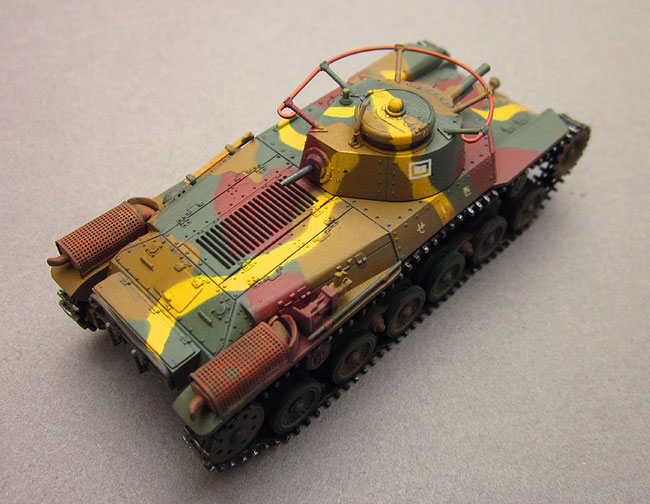
count and it was soon time for paint. The complex camouflage
left me in a bit of a quandary however. Dragon only supply
a 3-view painting diagram; front, rear and left side.
To compound the problem, the camouflage pattern on the
box artwork is quite different to the 3-view. A top view
would have been very useful, especially for the layout
of the yellow stripes. I decided to disregard Dragon's
drawings entirely and went with Tamiya's instruction sheet,
supplemented by information in AFV Profile 49, "Japanese
Medium Tanks". According to said profile, these tanks
were delivered in overall Khaki and subsequently camouflaged
in the field using Red Brown and Dark Green applied by
brush. The distinctive yellow striping was added as a
form of disruptive camouflage. As there was no set camouflage
pattern each tank would be fairly unique which gave more
scope for using a certain amount of guesswork.
Paints used were Humbrol 26 Khaki, Mr. Hobby Aqueous 47
Red Brown and 60 IJA Green. The yellow stripes were courtesy
of an old bottle of Aeromaster ID Orange/Yellow (which
completely dried up a couple of days after using it, thus
forcing me to mix an approximation of it from Humbrol
paints for later touch ups!). Exhausts are Model Master
1785 Rust, dry brushed with matt black and various orangey
colours and finished off with pastels. The machine gun
barrels are Humbrol Metalcote 27004 Gun Metal, which has
long been my gun metal paint of choice. The camouflage
was masked with Blu-Tack, pressing the edges down firmly
to obtain a hard edged camo. A couple of coats of Mr.
Hobby Clear Gloss ensured a shiny surface before decal
application.
Only one marking option
is included, that of the 9th Tank Regiment in Saipan,
1944. I've never had any problems with Dragon's decals
and these were no exception, being thin and with good
colour density and registration. A bit of Micro Set and
Sol settled them down nicely into the surface detail.
I didn't go as heavy on the weathering as perhaps I should
have given the environment the Chi Ha operated in, however
this was down to my reluctance to cover up what I consider
to be one of the more interesting camouflage schemes.
A thin wash of Dark Earth was sprayed over the running
gear and lower hull and thinned rust was washed over the
tracks, finishing these off with a dry brushing of silver.
Various brown pastels were used here and there to muddy
things up a bit. The anntenna is Mr. Metal Color Copper.
Final finish was Mr. Hobby Clear Flat.
Fit and moulding issues
aside, with only 53 plastic (including the DS Styrene
tracks) and 6 photo etched parts this was a fairly quick
and enjoyable build and I'm pleased to finally have a
Chi Ha in my small scale armour collection.
Addendum: Soon after
taking the photos, the DS tracks broke in two places on
the right side. Since then, both tracks have completely
and irreparably self-destructed into many tiny pieces.
The DS tracks on my Dragon
Firefly don't have this issue so this must have been
a bad batch.