I never let a model beat
me. Oh sure, they may sit around half-built in a box for
years with a "ha ha, you can't build me" smurk
on their smug little faces, but eventually I'll drag them
out, wipe that cheese eating grin off their clocks and
finish the suckers. This one however, very nearly became
the exception to that rule.
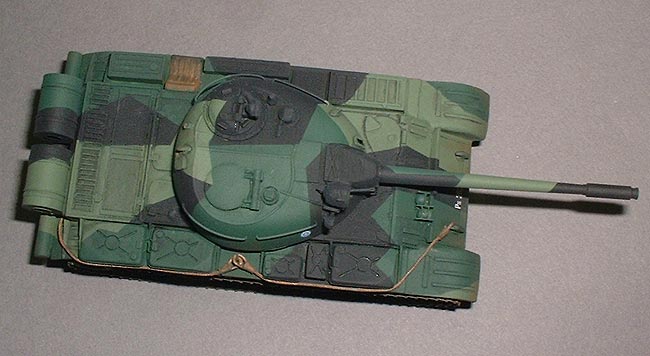
This is, I believe, the
Ace kit in a Siga box. I'm not sure what the relationship
between the two companies is but I hope it's an agreeable
one, and not a case of somebody copying somebody else's
work without their permission. The Siga release has different
markings options than the Ace kit, and it was the Finnish
version with its distinctive splinter camo that attracted
me. I wasn't too happy with the tracks included in the
kit which are quite thick and lack detail on the inside
so I decided to use Ace's p/e track set. I also struggled
getting the kit wheels and gun barrel to look good so
I figured I may as well replace those while I was at it.
I used a resin wheel set from MR Models and an Armo turned
aluminium barrel. In addition, tow cables from Eureka
XXL were utilised; more on these later.
My usual method for armour
is to build and paint the running gear then add the upper
hull, take care of any seams, paint the upper hull and
then add the tracks. This has always worked for me, or
at least it did until I decided to give photo etched tracks
a try for the first time. I figured I'd be able to just
slide the tracks in place between the wheels and fenders,
wrap them around the drive and idler wheels and then join
them on the bottom without any trouble. One completely
destroyed set of tracks and several broken off wheels
later however, I realised there was no way these puppies
were going in without tearing the upper hull off and starting
again. Despite already going back in the box countless
times in frustration and spending several years sitting
around mocking me, I plucked up the courage to rip and
tear and once more pulled it out from under the workbench.
Resistance was futile. I purchased a second set of tracks
and started again.
The tracks come in two sections each; these were folded
into shape and then annealed by heating them over a gas
flame and allowing them to cool naturally. This is absolutely
essential as it makes them soft and pliable and takes
all the springiness out which means they'll bend easily
and stay tightly wrapped around the wheels. To ensure
a good strong bond between each piece, a small section
of .005" brass sheet was inserted into each end and
soldered in place after cutting the tracks to the proper
length. Without the upper hull on it was far easier to
wrap the tracks around the wheels and glue them in place
and the whole operation was quite painless - except on
my wallet as p/e tracks are not cheap and I bought two
sets! I should also mention that these are the early version,
more like T-34 tracks, which I don't think are appropriate
for Finnish T-55s. They are also a bit too thin I think.
Nonetheless, they are a vast improvement over the kit
tracks (which are also early ones by the way) and I can
live with the inaccuracy.
With the tracks finally
in place, the upper hull back on and the damage from separating
it repaired, the rest of the build went fairly quickly
and easily. I have to admit I couldn't find a single photo
of Finnish T-55s with the rear fuel drums in place, though
several had the mounts for them. I like the way they look
so decided to add them anyway, but thought that scratchbuilding
the drums would ultimately be easier and produce a better
result than trying to clean up the multi-part kit tanks.
Using Evergreen 5/16" o/d styrene tubing, strip stock
for the reinforcing bands and mounting straps and .005"
sheet for the ends I managed to produce a couple of reasonable
facsimiles. These were painted seperately before adding
them at the end of the build. The fuel tanks on the side
were poorly moulded and suffered from sink marks so these
were sanded flat on the sides to clean them up and the
raised seams were reinstated from stretched sprue. The
unditching beam was replaced with a piece of 1/8"
wooden dowel with the straps from strips of .005"
plastic sheet.
The Eureka XXL tow cables consist of two soft copper braided
cables and four resin ends. This is the first time I had
tried them, though I have several sets in my possession.
Each set is for a specific AFV and has the appropriate
resin tow hooks for the intended vehicle included plus
enough braided cable for one model. The soft cable made
them a breeze to bend and position and I was very pleased
at how they looked once painted and weathered.
When it came time to paint
I was in a bit of a conundrum about which colours to use.
I came across a painting quide on the IPMS Finland website
(at least I think it was, but I can't find it there now)
which recommended Humbrol 102 for the dark green and 10
parts HU75 + 6 parts HU131 for the light green. This produced
two colours which were virtually identical to each other
however. I had seen other interpretations on various modelling
sites but in the end I decided to try and approximate
the colours I saw in various pics of real Finnish armour.
For the dark green I used HU149 straight out of the tin
and for the light green a 50/50 mix of HU102 Army Green
and HU120 Light Green. It may not be totally correct,
but it looks pretty close to me. The black is, strangely
enough, black, though the final finish of Polyscale clear
flat makes it look dark grey in the photos.
Decals consisted of two identification numbers for the
front and rear of the hull and two small national insignia
for the turret sides. These went on very well and the
carrier film completely disappeared after an application
of Micro Sol.
Well, it was a test of
patience and I thought it would never get done, but I'm
happy with the end result. The Siga/Ace kit is really
quite nice, despite the limited run nature, and builds
up into a nice representation of the T-55. The problems
I had in no way reflect on the kit or even the p/e tracks
for that matter, it was mainly my lack of experience with
the latter that caused me grief.
Above
& left: Three stages of making p/e
tracks. If you think detaching all those little
bits four times was fun, imagine how I felt when
I destroyed one set and realised I'd have to go
through this process all over again!
Below:
.020" pastic strips and a wooden jig were used
to keep the resin wheels properly aligned while
the epoxy set up.