The choice of injection
moulded Japanese armour kits in the manly scale is rather
underwhelming, to say the least. I'm really not sure why,
especially since so many manufacturers of small scale
AFVs are based on that side of the planet. I'd very much
like to see some WWII Japanese armour, like a Type 97
'Chi-Ha' or a Type 89 B 'Chi-Ro' for instance without
having to pay exorbitant prices for scarce resin kits.
Nonetheless, courtesy of a Chinese manufacturer we now
have three later AFVs to choose from: a Type 74, a Type
90 and this Type 61. Apparently the Japanese aren't terribly
imaginative when it comes to naming their armour.
I needed a quick and easy
build as a break from some more involved aircraft projects
I've got on the go at the moment and this kit seemed like
it would do the job. It wasn't quite as quick and easy
as I had hoped, but with one major exception it was a
pretty straightforward build so it fulfilled the therapeutic
need at the time.
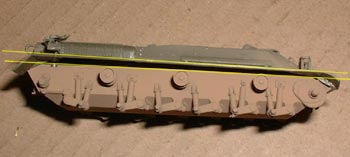
The one major exception
is, as you will see at the bottom of the page, that the
upper hull had a nasty slope to it when joined to the
lower hull. This also caused the upper glacis plate to
overhang the lower one producing a noticeable step. Not
only would this have looked rather odd if not corrected,
it also meant that the fenders would have been too close
to the drive wheels with no room for the tracks to fit.
The fix turned out to be pretty easy but even at that
there was just barely enough room to squeeze the tracks
in.
The tracks themselves weren't too bad though they could
have been a bit longer. They had to be stretched a bit
to fit but pictures show these to have quite a bit of
sag on the upper run and there is none whatsoever on the
model. I know many people are dead against "rubber
band" tracks but I don't have a problem with them
as long as they're well moulded and not too thick; these
qualify on both counts and they're certainly less fiddly
than link and length tracks.
Other than that the model is more or less right out of
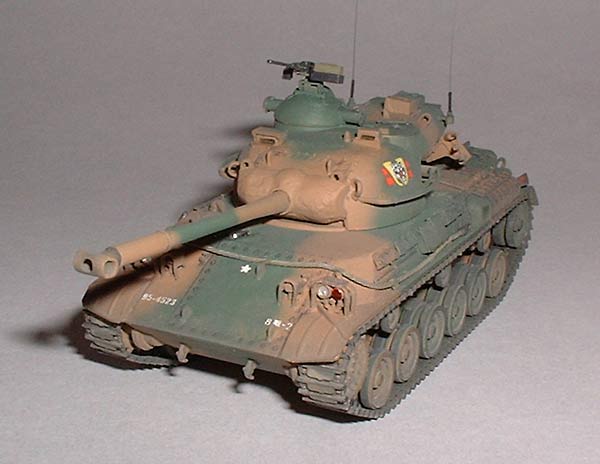
the box. Trumpeter include a short length of string for
the tow cable but I used my usual control line plane lead-out
wire (and I must try and scare up some more of this as
I only have enough left for one more tank) with the ends
from plastic rod and brass wire. The tools were all separate
and very delicately moulded so needed a great deal of
care when removing them from the sprue but look far better
than moulded on tools.
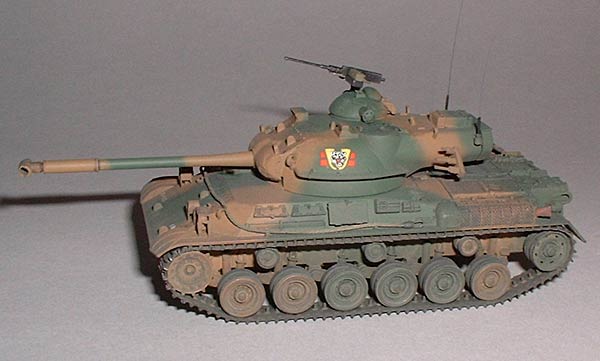
Trumpeter's decals were
absolutely superb, some of the best I've ever used. What
little carrier film there was completely disappeared when
applied with a bit of Micro-Sol and they settled beautifully
into the nooks and crannies and conformed to the compound
curve of the turret with no difficulty. The instructions,
on the other hand, left a lot to be desired. Although
there are several options on the decal sheet no mention
is made of them on the instruction sheet so I had no idea
which numbers went with which turret marking. There are
also some stencil markings but again, no mention is made
of where they should go. I would have liked to have finished
this in the "angry prawn" unit markings but
settled on this box top scheme instead, which is almost
as good.
When it came time to paint I was left a bit puzzled. The
nicely done artwork on the box top looks to be a dark
gray & green scheme, but on the sides of the box it
is depicted as red/brown & green. The painting instructions
left me no wiser as Trumpeter quotes a Gunze colour that
does not exist! I can find no reference to 'H 369' on
any Gunze chart and even on the official Gunze Sangyo
website the numbers don't go anywhere near this high.
If anyone knows what this colour is please let me know,
but I suspect it is an erroneous reference. In the end
I went with the scheme on the box sides, which is also
what Tamiya's 1/35th scale Type 61 is finished in. I used
Humbrol 30 Dark Green and a 50/50 mix of 119 Light Earth
and 62 Leather for the red/brown. Tool handles were done
in Satin Oak with an overcoat of Tamiya clear orange with
the metal bits in Testors Metalizer Steel. The machine
gun was Humbrol Gun Metal (well, it would be wouldn't
it?!) with a touch of dark blue in it. I used Micro Crystal
Clear for the vision blocks. I'm not a great fan of this
stuff for windows as it dries too distorted but it was
okay for these tiny openings.
Left:
Hmmm.... bit of a problem here. If left uncorrected
there would be no way the tracks would fit between
the fenders & drive wheels and the overhanging
upper glacis plate would look decidedly odd.
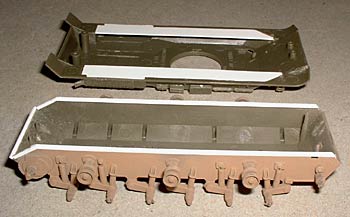
Below, left & right:
Fortunately the fix was pretty simple. .020"
x .030" plastic strip was glued to the upper
edges of the lower hull as a spacer and I also used
plastic sheet to fill in the gaping holes above
the track run which is a great improvement. Problem
solved.