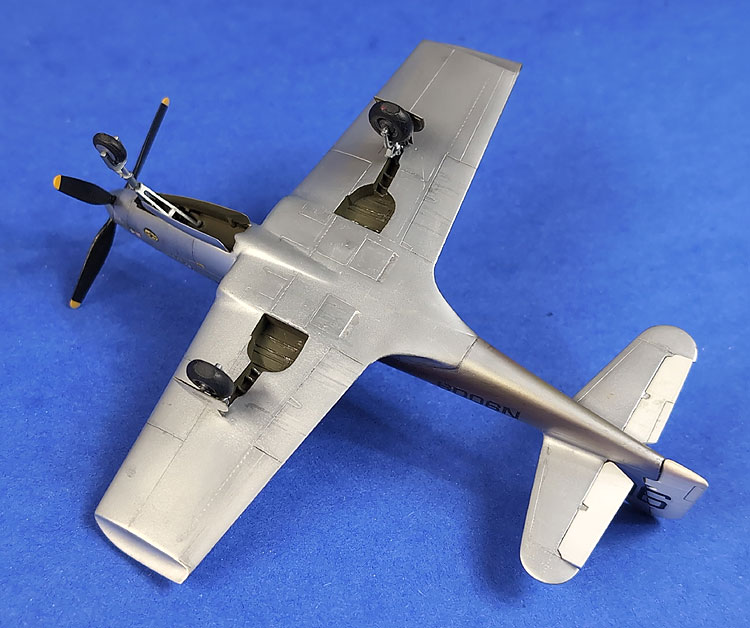
Eastern Express/XS
Models 1/72 Bell P-63 "Crazy Horse" Racer
I've always wanted to add
a model of this aircraft to my race plane collection.
With its drastically chopped wings, tiny canopy and simplistic
markings, it just exudes a "lean, mean, racing machine"
quality that appeals to me. As a pilot myself, I have
to admire the courage and skill that must have been required
to fly such a radically altered aircraft - those small
wings must have made it a real handful!
XS Models released a resin
conversion set several years ago and I was fortunate enough
to acquire one, albeit without decals. The set consists
of a resin upper fuselage decking, wingtips and spinner,
plus two vacformed canopies and a sheet of pictorial instructions.
With a bit of work, the conversion can be made to fit
pretty much any available 1/72 P-63 kit. Andreas of XS
Models was kind enough to supply me with both laser and
Alps printed decal sheets on the promise of a review of
his conversion, and for this I must offer my sincerest
apologies for taking so long to write said review; life,
and a horrible P-63 kit insisted on getting in the way!
I also had in my possession a sheet of Alps printed markings
from Thrust Decals, however these turned out to be unusable
for several reasons, more of which anon.
For the base kit I picked
up the Eastern Express issue of the Toko P-63. Having
already built a Toko
RP-63 “Pinball”, I thought I knew what
I was in for, however I hadn’t counted on the extreme
warpage Eastern Express had incorporated in its plastic.
It was obvious before I even got to the test-fitting stage
that the fuselage halves were badly warped, probably the
worst I’d ever seen, and this was to come back and
bite me several times during the build.
Construction started in
the usual way with the cockpit. The base kit includes
more than enough detail in this area, considering that
next to nothing will be visible through the miniscule
canopy. I added only seat belts from a Reheat set. Basic
cockpit colour is dark green which was unique to Bell
manufactured aircraft. I mixed this from Testors Interior
Green and Humbrol Bronze Green, though I discovered later
that neat Humbrol Dark Olive Drab wasn’t a million
miles away. Very few racers from this era bothered to
repaint the cockpit of ex-warbirds as it just wasn’t
worth the time and effort, so it was reasonable to assume
that this aircraft was left in its stock military cockpit
colours. Actually, I could have painted it bright pink
and no one would be the wiser given the tiny cockpit opening!
The cockpit was glued to one fuselage half and then I
attempted to cement the fuselage together. Despite the
one inch gap between the tail halves, the plastic was
fairly soft so I didn’t think it was necessary to
try and straighten the parts before assembly, relying
on plenty of rubber bands to hold everything together
while the glue set, and using plans to ensure the fuselage
was straight when viewed from above. This was not the
end of the troubles however as I discovered when it came
time to put the wings on, one of many reasons the kit
sat around unfinished for so long. Once the fuselage was
fully set, I removed the area of the upper fuselage which
would be replaced by the resin item. A sprue crossmember
was glued in to strengthen the now flimsy fuselage halves
and to ensure they matched the width of the resin piece.
The resin part was super glued in place, the fit being
very good despite the fact that it wasn’t tailored
to this specific kit. The fuselage was then set aside
while I tackled the wings.
From experience with the
RP-63 build I knew that the trailing edges of the wings
were quite thick and needed a lot of scraping and sanding
on the inside surfaces. This time I decided to make short
work of it with a sanding drum mounted in my Dremel tool.
This requires a deft touch as it is very easy to melt
the plastic and deform the trailing edge, but it drastically
reduced the time and effort needed. I finished off by
smoothing the plastic by scraping with a hobby knife and
then sanding with fine wet and dry. The result was nice
thin trailing edges, greatly improving the appearance.
As moulded, the wheel wells represent the early round
wells found on ‘A’ series aircraft, the inner
sides therefore needed to be filed out to the later rectangular
shape as noted in the XS instructions. Once complete,
the wings were cemented together and clamped overnight.
Using a razor saw, the wings were shortened by the amount
stated in the XS instructions ready for the replacement
Hoerner tips.
Now the real fun began. Referring to plans again, I test
fitted the wings and it was at this point I noticed something
had gone seriously awry. It was obvious that when the
wings were aligned in plan view, the leading edge radiator
inlets were offset relative to the fuselage when viewed
from the front. If I lined the inlets up correctly then
the wing was noticeably misaligned when viewed from above.
It seemed there was no way to get the wing to align from
both top and front views – fixing one skewed the
other. Being a simple soul it took me some time to work
out what the problem was. Though the grossly misshapen
fuselage was now straight in plan view, it never occurred
to me that it was warped in more than one dimension (this
is starting to sound like a sci-fi article!), but this
was indeed the case. The nose was twisted slightly when
viewed from the front which explained why I couldn’t
get the radiator inlets to line up properly. There was
only one solution; for crimes against modelling, the kit
must go back in its box for a lengthy period of penance.
That’ll teach it.
Life went on, and in the
meantime I had got married, got my pilot’s license,
started a business
and built other more co-operative kits. In other words,
I was busy enough to forget about this nasty piece of
plastic for a good long time. Eventually it was re-discovered
cowering under the workbench covered with dust and cat
hair. Feeling somewhat magnanimous, I took it out and
gave it a full pardon.
I decided to tackle the twisted fuselage in two parts.
First the wings were attached, ensuring they lined up
in plan view and ignoring the misaligned radiator inlets
for the time being. Liquid cement was run into the seams
at the roots and trailing edge only and rubber bands were
used to hold the wings in place until the glue set overnight.
There was a small gap between the leading edge of the
wing centre section and the nose which turned out to work
in my favour. By wedging thin plastic sheet into the gap
I found I could twist the nose into alignment and hold
it in place with superglue. Though the leading edge inlets
still weren’t perfectly aligned, they were greatly
improved and only needed a bit of work with a round needle
file to centre them. The slight remaining twist in the
nose really isn’t noticeable. Unsurprisingly, the
resin insert popped off during this work and had to be
reglued at the front.
I had previously removed
the rudder and elevators as per my standard practice,
I think aircraft models look better if at least some of
the control surfaces are displaced. The horizontal stabilisers
were now cemented in place, the fit being less than ideal.
The resin wingtips could now be attached and here I encountered
the second problem in the build. One of the wingtips had
a large bubble in the worst possible place; in the thin
trailing edge right at the tip. The tips were also slightly
too long in chord compared to the wing. In an attempt
to kill two birds with one stone, I shortened and reshaped
the trailing edges of the tips to match the wings, thereby
reducing the bubble to a more manageable size. The wingtips
were superglued on and the remaining bubble filed flat
so a small piece of .010” sheet could be attached
and filed to shape. The resin pieces captured the complex
shape of the concave wingtips nicely, unfortunately it
also meant that my repair had next to no surface area
to attach to, given how thin the trailing edges were.
I only had to look at the tip the wrong way and my repair
job would go pinging off into space, never to be seen
again. I lost track of the number of times I repaired
that wingtip and after the joy of the misaligned wings
and twisted fuselage, my patience ran out and the recidivist
went back in the box.
It was a shorter sentence this time, so after a couple
of months I brought it out and got back to work. To minimise
the risk of damaging the tip yet again, I took care of
all the filling, sanding and rescribing at this point.
The base kit was covered in recessed rivets and panel
lines, the latter being somewhat inconsistent in depth
and width. As this was to be a natural metal finish a
lot of work went into cleaning up the surface texture
and ensuring seams were eliminated. Some of the panel
lines on the resin upper fuselage were also a bit heavy
handed I thought so these were filled and rescribed to
match the kit. Several coats of primer were sprayed on
to check seams and once I was happy with everything I
got back to that pesky wingtip. Abandoning the plastic
repair, I decided to go with my favourite filler: cyanoacrylate
and talcum powder. This can be mixed to any consistency
and is easily sanded even after several days thanks to
the addition of the talc, unlike straight cyano which
sets rock hard and must be sanded straight away. A small
piece of tape was placed under the wingtip and the cyano/talc
mix was blobbed on and set with superglue accelerator.
The tape was removed and the repair filed and sanded to
shape. This was far more robust than the plastic method.
The aircraft was given a coat of gloss black enamel and
a polish with various grades of polishing cloths and it
was ready for the bare metal finish. Finally.
Testors Metalizer has always
been my favourite for metal finishes as it has a fine
grain, will put up with a fair amount of handling, can
be masked with low tack tape and can be polished as much
or as little as you like. Sadly, after a brief introduction
to the UK, Testors products are once again becoming increasingly
unavailable as the sole distributor found it too problematic
to import. Eventually, thanks to misguided regulations
and overbearing bureaucracy, we modellers will be left
with nothing but pastel house paints to cover our models
with - but I digress. I was down to a few precious bottles
of Metalizer that I brought with me from Canada many years
ago and the age of these paints caused me yet another
problem. Over the years some of the solvent had evaporated
from the Aluminium. It was still thin enough to spray,
but the first coats were a disaster; grainy, lumpy and
dull. Being a lacquer based paint, Metalizer is not easy
to remove without damaging the base coat or plastic underneath.
I could sense another lengthy stay in solitary confinement
coming up but I was starting to get annoyed with this
project so, in a fit of desperation, I resorted to the
polishing cloths to see if I could remove the paint that
way. Suddenly, the problem turned into a happy accident
– the horrible lumpy paint job became a gleaming
metal finish after a session with 8000 and 12000 grit
polishing cloths. A reprieve! I ended up with a finish
that looked far superior to just polishing with a soft
cloth which is how I’d always done it previously.
Several panels were masked off and sprayed with darker
shades of aluminium achieved by mixing with other Metalizers
such as Dark Anodic Grey and Magnesium. These too were
polished with the fine grit cloths. The real aircraft
wasn’t terribly bright and shiny however so some
of the shine was knocked back during the finishing stages.
Unbelieveably, it looked like I was finally on the home
stretch. As I mentioned previously, I had a few options
to choose from when it came to markings, though I quickly
rejected the Thrust decals. The nose art was wrongly proportioned
and the Crazy Horse lettering was yellow when it should
be white. The horse was also depicted as white with pink
dots when in fact it was only a black outline with pink
dots. All the other markings on the sheet were sized incorrectly.
In the end the only marking I used from this sheet was
the upper wing number, though I think this is also the
wrong size. I could find no good view of the top of the
aircraft, but in several pictures part of the number is
clearly visible overlapping the leading edge of the right
wing, which leads me to believe it was the same width
as the wing. Thrust’s depiction is nowhere near
this big, but the wing number is missing from the XS sheets
entirely so I had no option but to use it. All other markings
are included on the XS sheets and they are very good.
Most of them came from the laser printed sheet with the
exception of the white Crazy Horse logo from the ALPs
sheet (most laser printers won’t print white). Both
types of decals were well printed and went down well,
though I should have paid heed to the instructions and
applied a white backing to the yellow Penzoil markings
first as these are slightly translucent.
Other than the bubble in
the wingtip the only other issue I encountered with the
resin parts was the spinner which was far too small, possibly
this had been designed to fit another P-63 kit. I ended
up modifying the kit spinner by filling the cannon opening
with a piece of plastic rod and then filing and sanding
it to a point. Brass rod was superglued in the spinner
backplate which allowed me to chuck it in a pin vice so
it could be shaped more easily. The prop blades were cut
from the kit hub, painted and decalled, and inserted individually
using a simple jig as a guide.
Both vacformed canopies had sizeable dents in them rendering
them unusable. Whether they had been supplied this way
or had been damaged at some point while sitting around
for years I can’t recall. I filled both canopies
with casting resin which in turn had the dents filled
with the cyano/talcum powder mix. I also took the opportunity
to correct the shape; as supplied the rear section had
a concave section when viewed from the side, whereas it
should be a straight line. This was filled, reshaped and
then the forms were polished ready for vacuforming new
canopies. The best of the two copies was picked and affixed
to the model with Testors Clear Parts Cement.
One final task remained in the form of making a new rudder
to replace the one that had mysteriously disappeared over
the years the kit had been sitting in its box. This was
made from laminated .040” pastic sheet, cut and
sanded to size with the ribs represented by stretched
plastic strip. The trim tab was scribed in and then the
rudder and elevators were sprayed Tamiya White.
Final additions were the landing gear, control surfaces
and the two whip antennas at the top of the tail from
thin wire.