Roden's kits have a reputation of being
difficult to assemble and after the joy of battling their
LaGG
3 I can't say I totally disagree with that. Fortunately
the SE5a, though not a cake walk by any means, actually
went together fairly easily. As easily as you can expect
from a biplane anyway.
As far as extra detailing goes, this was pretty much a
bog standard WWI build for me. I used an old Eduard p/e
set for the cockpit and Lewis mounting. Despite being
designed for the Revell kit it fit the Roden SE without
any trouble. I did have to modify the Lewis mount a bit
by cutting off the perforated rail at the rear and re-mounting
it at the proper angle. This would have been necessary
regardless of which kit it was used on. I also added .010"
sheet to either side of the vertical mounts to beef them
up a bit and sanded them to a streamlined shape.
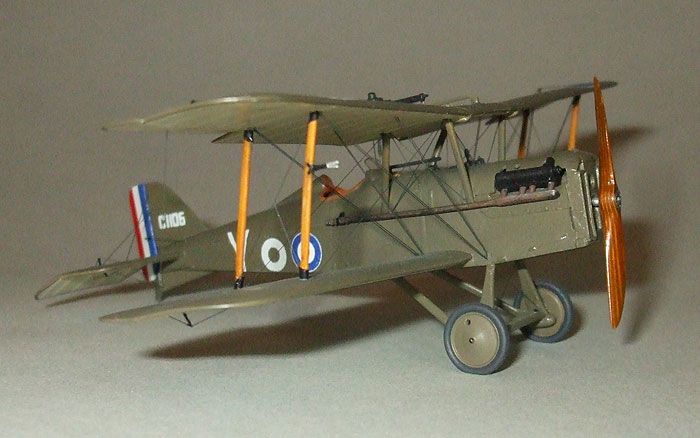
Prop is the usual carved wooden affair
with an Extratech p/e boss, rigging is stretched sprue
and Aldis sight is stainless tubing with the mountings
from the Eduard set.
(Click
thumbnails to change image)
Pulley inspection panels in the wings
& stabiliser are represented by decals in the kit.
A nice thought, but they look rubbish nonetheless. I drilled
straight through these on the plastic parts and then filed
them to the correct triangular shape. The bottoms (or
top in the case of the top wing) were covered by .005"
sheet and faired in with Mr. Surfacer. The clear covers
are from decal film and the pulleys themselves punched
from .015" sheet. These are pretty prominent features
on the real aircraft so are worth spending a bit of time
on.
I used decals from Americal Gryphon's No. 1 Sqn. sheet
which was rather disappointing. All the fuselage codes
and serial numbers were printed far too large, making
most of them unusable. I picked aircraft "Y"
as it was one I could cut down to size, though there was
nothing I could do about the serial on the fin. The white
outlines on the roundels were out of register (a common
and annoying problem on the many different sheets of British
roundels I have) so I substituted some from Pegasus. These
were not without problems either however, being very brittle
and translucent. I used some generic white backing circles
from Fantasy Printshop to double up the centre of the
roundels which fixed the translucency issue. The fractured
decals were touched up with Xtracolour Roundel Blue which
I also used on the edges of the blue rudder stripe.
PC-10 colour is a 50/50 mix of Xtracolour
Olive Drab and US Army Helo Olive with a splash of brown
thrown in, the final finish a 50/50 mix of Gunze clear
flat & gloss. The bottoms of wing & stabiliser
were done in Xtracolour Linen. The rib tapes were masked
using thin strips of Tamiya tape and then oversprayed
with a light coat of Gunze Smoke. Exhausts are Testors
Metalizer Burnt Metal, drybrushed with brown, rust and
black paint.